Showing posts with label Fruit. Show all posts

Sunday, September 12, 2010

Random Turquoise & Grapes

So this was a really random design I did while bored at my University Residence without my laptop. I don’t love it and I wish I had left it with just the plain colour because I liked that much better.

P9090141

The base colour (which I liked a lot) was China Glaze in Four Leaf Clover. The colour in these photos looks a little different than it does in real life. In real life the polish is a more pure green colour, not as minty as it looks in the pictures.

P9090143

When I ruined it (I mean stamped it…) I used Sally Hansen Celeb City. I stamped the lace/fishnet pattern on plate m57. Then on top of that I used a dark purple from Claire’s (no name sticker on the bottom) to stamp from plate m55.

P9090161

I used the grape image just because I really like it a lot. I had been wanting to use this image for a long time, but never found a good design. Apparently I still haven’t found a good one because I don’t like this at all.

What do you guys think?

Friday, June 25, 2010

Watermelon

So here is my first attempt at making a watermelon nail design. It is very popular for summer, I see it on many many blogs. But I'm not exactly here to show how amazing mine is, I am here to give my opinion on if it really is a "beginner design".


I started simply enough, with a base coat. (Sally Hansen Extended Wear Base Coat). You can see my review of this on another post coming soon.

Next I used my closest watermelon pink, which was Sally Hansen Hard as Nails Xtreme Wear, in Fuchsia Power.
*Side note - I always thought fuchsia had more purple to it, this was plain pink...

Next I brushed a strip of green across the tip. It was relatively straight, but the white is supposed to cover it so it didn't matter that much. The green I used was one in the back of my cupboard. It says Splash on the top, but the bottom says FACES. So I think it is a brand from FACES cosmetics.
After the green I painted little black dots, using Sally Hansen Hard as Nails Xtreme Wear, in Black Out, and a toothpick. I really do like most of Sally Hansen colours, they show up well and and are only about 2$ Canadian. The pale ones need a lot of coats, but the solid colours like these two are great.
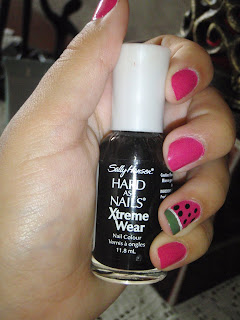
Lastly I used my new best friend, as mentioned in my first post, the Sally Hansen Nail Art Pen. I used it to make the white line that separates the green and pink. My hand wasn't perfectly steady so my line is a bit wiggly. But overall I did complete the design as instructions said.

I used a top coat by Revlon, which I really like. Look for a post all about that coming soon too.

Anyways, this design was simple to understand, a bit harder t do than I expected, but that might just be because it was my first try. I will be trying it again in following weeks to see if I can get any better. For those of you who are new at nail art, I would suggest this design. I have gotten lots of compliments on it, and I do agree it is really cute. As many people have mentioned, it is a bit tacky to do it on all fingers, I chose ring fingers only. That could be an age thing though.

Anyways good luck trying it yourself!

Any ideas you want me to try my hand at ( haha get the joke...? ) just let me know!
Related Posts with Thumbnails