Wednesday, June 30, 2010

Fairy Teal by Sally Hansen


This is Fairy Teal (cute name right?) from the new Sally Hansen Complete Salon Manicure line. this was sent to me by the company, I appreciate it very much!

The formula for this polish line is said to be everything you need in a manicure, all in one polish.

Base Coat, Strengthener, Growth Treatment, Colour, & Top Coat.


I did notice the formula being slightly thicker than my other Sally Hansen polishes, which may be because it has 5 steps in 1. But it was not too thick that it was an issue at all.

The colour is really nice, not too flashy and bright, but not dull. It looks a lot more blue in the bottle than when it is on. It definitely is a true teal. I find that most colours called teal are usually too blue or too green or too bright to be an honest teal. This one is perfect. Not too light that it would be turquoise, and it reminds me of a swimming pool in summer. I am enjoying it more and more, as it looks great in many lights.

The shine is incredible, as you can see in the photo of my toes. I did not apply any top coat to this polish, and it looks great. My camera was getting a very blue hue to this colour, no matter how hard I tried, so picture it with more sea green in it, very teal!

The only issue I had with this polish, and this may be the lighting or the colour, so I could correct myself when I try another colour later, was the almost holographic appearance in certain light. In certain light and at some moments it was so shining it was almost blinding. It looked like I had missed patches of my nail, but it was just such a strong shine. This can probably be fixed with a matte top coat, but even so it is a minor setback to an otherwise great nail polish.

The brush was very wide, which was great because I was doing my toes, but I wonder how it will fare for fingers.

Its been about four days now and every time I look down I am more in love with this colour than before. It is quickly becoming one of my very favourites. I really really love the colour and shine, and it continues to surprise me in different lights.

Thank you to Sally Hansen for sending me a package, but keep in mind these are my own honest opinions, with no influence from anyone.


Love It.

New Design

I started this blog late one night, and over the past week or so I have grown to not exactly love how it looks. So I remodeled it. Same old me, but I think it looks a bit cuter.

Enjoy!

Tuesday, June 29, 2010

Mommy's French Mani


I did these freehand white tips in about five minutes, using two coats of Sally Hansen Hard as Nails Xtreme Wear in White On. Then I used Konad plate m4 and used the little flowery straight design, to go across the tips of the ring and thumb. I used Konad Special Polish in the pale pink colour (does it have a name? I'm not sure..) and for a little sparkle I added a dot of glitter in the middle of the flower.


I topped it with a clear coat, Konad for the fingers with stamps, and Sally Hansen for the others.


Very cute and summery.


I know it is pretty simple, but that is what Mommy wanted so mission accomplished.


Here are some close ups of the Konad design, in light and dark.


Monday, June 28, 2010

Big Bunch of Colour Swatches


These came from a package sent by Sally Hansen, big thank you to them!

These colours come from three different lines; Sally Hansen Complete Salon Manicure, Sally Hansen Insta-Dri, and Sally Hansen Diamond Strength.

Complete Salon Manicure Colours:

All of these polishes had a good consistency, not too thick or thin. They feel like they would hold up well. Also, they only needed one or two coats to get fully opaque, which is great compared to the average two or three coats need for other Sally Hansens (such as Xtreme Wear).


1) Fairy Teal - Really like this colour, it is a true teal. It will be having its very own post because it was my favourite, so check that post for more info. I didn't make a single nail swatch for this so you can see it in the post coming soon.

2) Gilty Pleasure - Found out this can be used for Konad stamping! I am very excited. This colour is a brown gold and is very sparkly and shimmery. I like it and think that I can get use out of it, although it is not a staple polish.

3) All Fired Up - This is a typical fire engine red, with a shimmer to it. It is one I feel like I have seen many times over, but it is still a go to colour for anyone. Red will always be a staple polish colour, so this is useful but not unique.

4) Angel Wings - This colour was my least favourite of the group, just because the colour part is lacking. It was not strong, and seemed to still be very pale even after two coats. It seemed like an attempt at a nude nail, but the shimmer was too distracting to be classified as simple or nude. I am not sure where or when this could be used...

Insta-Dri Colours:
They do dry very very quickly! Which is a big plus for me. The rounded brush is different..but I am not sure how useful it was. There was no huge difference between that and a flat brush, although there was s mall difference maybe. It seemed to go on smoothly and they are each shown with two coats.


1) Instant Iris - Iris? not exactly. It seems more like fuchsia or pink to me. In fact I found it very similar to the Speedy Sunburst. This colour was pretty, but that is kind of where it ends for me. it also seemed that it was still semi-see through after two coats. Not one of the best I have ever seen.

2) Brisk Blue - Really like this colour. Summery and very pretty. Also seen around a lot before, but I still have a soft spot for it. Application was great, and I probably could have gotten away with only one coat. The removal though was more difficult, as it left stains of blue around the cuticle. Overall though I still like it, and it seems like a good go to blue for this summer. I am also excited to try this for my Konad, as it is said to work great for stamping!

3) Speedy Sunburst - This one was a very hot pink, and these photos do not do it justice. I could not capture the right colour no matter how hard I tried. I really liked it for a go to hot pink, very pretty and girly and good for summer.

Diamond Strength Colour:

This is the only one of this line that I have ever tried, so my comments are only focusing on this specific polish.


Silver Anniversary - This one was okay. It was a nice silvery colour, but not as bold as I had expected from the bottle. It was a good consistency and covered pretty well with the two coats. But overall I don't have much to say about it. It is nice, and that is all I really have to say. Not the most useful, not a go to colour, but if you can find a reason to wear it the its nice.

Comparison:

I found that the two Insta-Dri colours of Speedy Sunburst and Instant Iris looked pretty different in the bottles ( see top of post for bottles ) but the colour on nails had a much smaller difference, just some sparkle and a hint more purple. Just to show a better look at that... the top one is Speedy Sunburst, the bottom is Instant Iris.


These opinions are entirely honest and my own, with no influence from the company. Thanks again to Sally Hansen.

Giveaway Again


Giant giveaway by Babbling Brooke. Really great prizes, looks amazing! Check it out, it isn't until July 14! Right around my birthday, hopefully that means good luck!

Sunday, June 27, 2010

Summer 2010 Colours


Ignore the messiness, it was early this morning...

These are my four go to colours for this summer. Vibrant, bright, fun, to me that is what summer 2010 will be. Starting off with big events such as the World Cup, it looks like this summer will be a great one for everybody.

To go with that great spirit I feel like these four bright polishes are perfect for the beach, the patio, and any other summer activities.

The orange and blue both come from U.S. brand, called L.A. Girl Flare. They are really nice and thick enough to only need one coat for the blue, and two for orange.


This pink was used in my Watermelon design, and it really is great for a fun summer look. It is Sally Hansen Hard as Nails Xtreme Wear.

The green is Essence Colour & Go. I got this in Germany last year and love it. Very bright and pretty lime green colour. The pink needed only one coat and the green was two.

Do you agree or disagree, are these the colours of summer 2010?
Let me know what you think..

Saturday, June 26, 2010

Last One For Today, Giveaway


Last one for today..this one is a bit different, it has two winners. Yay! More chance for me haha.

Okay so this is by the blog Also Known As... Looks really good, big variety of prizes.

It was said it was done for the blogger's birthday, and guess what? Mine is in a few days also. Maybe that is a sign... I hope so!

Wish me more luck, please & thanks.

Yet Another....Giveaway

Today it is raining here, so I am just around the web looking at all the amazing blogs, and I came across another giveaway. I am sure there will be plenty more.


This one is from Sweet Sugar, who has over 300 followers. I am so impressed by this huge blog community. Anyways it looks great, I chose this photo because I have used Essence polishes before and love them, but I only have a few so winning this giveaway would be great.
So wish me luck!

Really Huge Giveaway


Doesn't this look amazing! Biggest giveaway I have ever seen!
This is from Parokeets, link to the giveaway is here :
This looks really amazing, wish me luck!

Another Giveaway


Since I am very new at this blog things, and I live in a tiny town, I have never even seen Nubar products until this week. Everyone raves about them and I am super interested in trying them out for myself! I entered another giveaway (by Painted Lady Fingers) so wish me luck. Hopefully I can try this brand soon!
Again I am super impressed, she has over 1200 followers! That is crazy! Keep it up :)

Entering Giveaway!


Wish me luck please! This is my first time entering a giveaway. It looks great! I don't exact;y know how these work but it seems like a lot of fun. It comes from Susie's Home and Hobbies.
I am so impressed, she has almost 500 followers! Wow!
Keep up the great work Susie, I'll be crossing my fingers!

Friday, June 25, 2010

Snow Fairy by LUSH


Just to say, LUSH is one of my all time favourite stores in the whole world! I adore it. It is environmentally and animal friendly. It has incredible products that are so unique and smell amazing! I love the store and am a frequent shopper.


This particular product comes out at Christmas, and is a shower gel. It is called Snow Fairy, and smells like candy. So yummy. When you use it it smells so good, and the scent lasts a long time after your shower. I get so excited thinking about having a shower!


I wish this was around more often than just Christmas. I am going to stock up next year for sure. I really like everything about it, including the package. The little sticker that shows you a cartoon of who made it is such a cute idea! I love the description too, it is very clear and lets you know exactly what you're getting.


The only problem is that all my sparkles are settled at the bottom, and no matter how hard I shake they won't mix in. Boo :(


But other than that this one of my all time favourite things from LUSH.


If you have not checked out the store, I highly recommend you do. Just one whiff and you'll be hooked!


Love it!

Covergirl Smoky ShadowBlast


Alright well, I must say I am disappointed. I knew going into this I would not come out looking like this.. Drew Barrymore, but the eye shadow was way off. Not only was the colour very weak, but the texture and feeling is definite turn off.


I used Covergirl Smoky ShadowBlast in Bronze Fire. I was expecting an actual colour to some out of this. I feel like i look exactly as I started, maybe a bit of shimmer.


Step 1 is a pale gold colour shadow stick, with a rounded end. Use it on the whole lid for the base colour.


Step 2 is a dark brown colour that looks rich and deep in the stick. On my eye it was pretty much invisible. It is used for the crease and blending, to give the smoky look, darker on the crease and outer lid. It did not do that for me.


The top is my eye with only Step 1. The bottom is with Step 2. I see very little difference, if any at all even.


The biggest issue with this product has got to be the feeling. The fact that I can feel it at all is a problem straight away. It feel heavy on my lids. It was slimy and sticky and just feels very gross. Especially in summer, who wants their eyelids to be sticking together? Mine are right now and it is not pleasant. I thought at first it may dry to a powder or at least dry at all, it didn't. I have been doing routine checks to see if it still feels wet and sticky, and its been about an hour and it is still very slimy. I hate to say it but its a gross feeling. My eyelid is literally stuck open and I can feel that squishy feeling every time I blink. I am expecting it to basically melt off my face soon...


Another issue is that i have build up of the product in my crease. it really is not working out well, especially compared the the video on the website. I was expecting much more vivid pigment for the colour, and an actually workable product. I got neither.


Overall its a great idea, two colours to make a perfect smoky eye, all in one compact product. But when actually put to the test, it isn't the greatest. From far away it looks like a natural maybe shimmery pale shadow. It was supposed to be an intense dramatic smoky eye.


Unfortunately I will not be using this again, which is a shame because the colours are nice (a little light and pale for my taste, but still pretty for something), the feeling turns me off completely. I feel like it is a waste of a great idea because it just feels so yucky when its on.


Leave it.

Watermelon

So here is my first attempt at making a watermelon nail design. It is very popular for summer, I see it on many many blogs. But I'm not exactly here to show how amazing mine is, I am here to give my opinion on if it really is a "beginner design".


I started simply enough, with a base coat. (Sally Hansen Extended Wear Base Coat). You can see my review of this on another post coming soon.

Next I used my closest watermelon pink, which was Sally Hansen Hard as Nails Xtreme Wear, in Fuchsia Power.
*Side note - I always thought fuchsia had more purple to it, this was plain pink...

Next I brushed a strip of green across the tip. It was relatively straight, but the white is supposed to cover it so it didn't matter that much. The green I used was one in the back of my cupboard. It says Splash on the top, but the bottom says FACES. So I think it is a brand from FACES cosmetics.
After the green I painted little black dots, using Sally Hansen Hard as Nails Xtreme Wear, in Black Out, and a toothpick. I really do like most of Sally Hansen colours, they show up well and and are only about 2$ Canadian. The pale ones need a lot of coats, but the solid colours like these two are great.
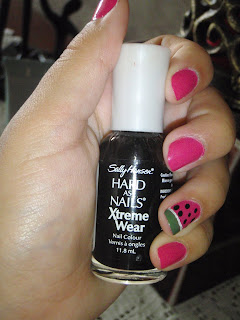
Lastly I used my new best friend, as mentioned in my first post, the Sally Hansen Nail Art Pen. I used it to make the white line that separates the green and pink. My hand wasn't perfectly steady so my line is a bit wiggly. But overall I did complete the design as instructions said.

I used a top coat by Revlon, which I really like. Look for a post all about that coming soon too.

Anyways, this design was simple to understand, a bit harder t do than I expected, but that might just be because it was my first try. I will be trying it again in following weeks to see if I can get any better. For those of you who are new at nail art, I would suggest this design. I have gotten lots of compliments on it, and I do agree it is really cute. As many people have mentioned, it is a bit tacky to do it on all fingers, I chose ring fingers only. That could be an age thing though.

Anyways good luck trying it yourself!

Any ideas you want me to try my hand at ( haha get the joke...? ) just let me know!

Sally Hansen Nail Growth Activator


Wow! This is like miracle growth for your nails! I had a little disaster the week before my prom. Actually less than a week. My nails were so short and brittle and dry and peeling. Everything you don"t want for a big event. So I turned to this product, Sally Hansen Nail Growth Activator. And it worked wonders!


Directions say to rub it on your nails morning and night every day. I kind of followed that. Sometimes I forgot, sometimes I did it more often when I was just sitting down. But either way it was amazing. My nails went from thin and short to beautiful and moisturized and growing like crazy! In only about 4 or 5 days. I am so impressed, I have not stopped using this product since. And I go it in mid May.


Another great thing, using it two to three times a day, every day, since mid May, and I STILL have like the entire bottle left! I love it. It has no smell, just a slight seeweedy kind of one, but much better than what I had expected. It was relatively cheap too, only about 6$ Canadian.


Overall great product. Worked like a charm. I definitely recommend it.


Love it!


P.S. I really need followers! Please :)

Wednesday, June 23, 2010

Sally Hansen Nail Art Pen

Okay so here goes my first product review! This is the Sally Hansen Nail Art Pen. Big name for such a small product. But as they say, size does not matter. This product turned out to be fantastic.

The first two or three times I used it though, I found it to be thin and watery. I did not like it one bit. But the fourth time, it was amazing! Clearest little lines I have ever seen. SO much better than the toothpick method most of us use for little dots. It made the tiniest flowers and was so precise.

Also, it was great to use because when I made a mistake, I could rub it off with my finger and it was gone. I didn't have to use remover or anything. But once i left it for about 30 - 45 seconds it was dry. It needs a top coat to keep from chipping, but what doesn't?


Obviously nobody really wants to decorate their nails like this, but I was trying to show what you can do. You can write full words! Tiny little baby hearts. Really small and precise dots. I did this in about a minute, so obviously much better work can be done with this nifty little pen.

Anyways, it is so great, I am definitely running out to buy more colours, I have so many possibilities in my head now! I recommend this for sure. I can't say yet how long it lasts, but it is way better than trying to dip a gloopy toothpick into a bottle and getting it all over. Very cute, very useful.

Love it.

Hello

Hey everyone! Well I hope there is an everyone...

I'm really excited to start this blog, it is something I have always wanted to do. I see others all the time, but they always seem a bit too professional. I'm here to be a little more normal, simple, easy for the average girl to learn from.

I'll try out all those products you've had your eye on, but never got around to buying because you just don't know if they will work.

Wish me luck! See you soon I hope!
Related Posts with Thumbnails